We all know that one of the best practices in email marketing is to maintain a clean email list. But it’s also true that even if you do everything possible to keep your email list clean, bounces still occur!
Normally, all email errors referring to bounced emails are sent to the sender’s email address.
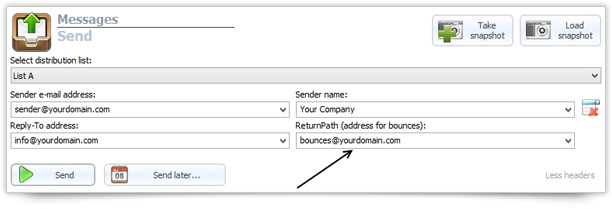
SendBlaster 3 allows you to set a custom Return-Path address, so that all your outgoing email messages that generate (hard) bounces are forwarded to a specific email account (e.g. bounces@yourdomain.com), and not to the “FORM” address.
This way, you will be able to manage bounces more efficiently because all the error messages will not be mixed up with “good” emails in the same email account.
But what is Return-Path?
Return-Path is an important field contained in the mail header, together with other fields like From, Subject, Date, Envelope-to and Delivery Date, that shows the email address which bounces should be delivered. Like all other fields, the return-path is not visible.
If you want to add a custom Return-Path address every time you send out a mailing with SendBlaster, simply select the Send panel and then click on Choose different addresses for replies and bounces. The “Return-Path” address field will appear, close to the “Reply-to-address” field.
Now simply enter the email address where you would want your bounce-back messages to be sent.
If you have added a custom returnpath address to your emails, and you have verified that it’s working properly, remember also to enter it in the Manage bounce-backs panel in order to perform periodical hygiene checks (e.g. Processing and removing bounces automatically from your list).
